But the truth is, I want people who read my blog to go browse my Flickr images (and I want people who browse my Flickr images to read my blog :). While the first method described above will create a link to my photo's Flickr page, I can't deal with the limited formatting and only being able to include a single photo. So, I'll explain my favorite method of blogging Flickr photos.
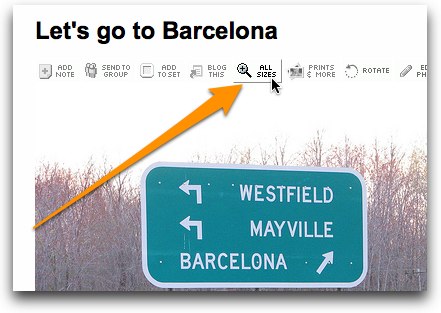
First, go to the Flickr page of the first photo that you want to write about. Click the All Sizes button above the photo:
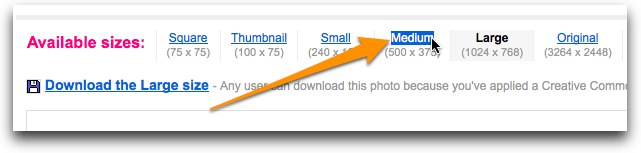
On the Available Sizes page, choose the size with the width that is closest to the final size that you want to display the photo at. I'm going to display my photos 400 pixels wide, so I choose the Medium size which is 500 pixels wide.
A 500-pixel wide version of your photo will be displayed. Below the image itself, you'll find a chunk of HTML code that displays the image and creates a link to the image's Flickr page.
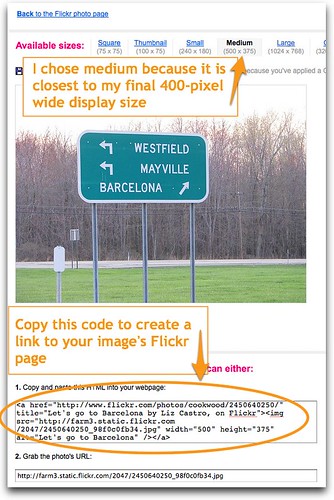
Copy that chunk of code.
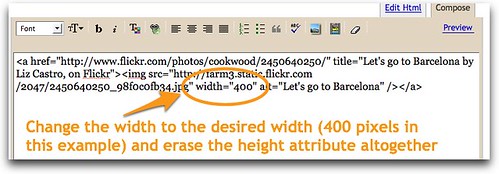
Now, switch to Blogger and paste the HTML code into your post. Notice the width and height attributes near the end of the code.
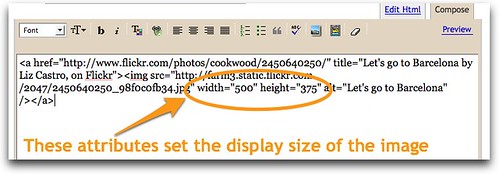
You can now adjust the width to the desired number of pixels (400 in our example). Get rid of the height attribute altogether; the height will be calculated by the browser automatically, depending on what you put in for width.
Why is there so much code there? The
a tag is the link part that will bring visitors to your Flickr page when they click the image. The title attribute within the a tag displays descriptive text when your visitor hovers over the image. The text is generated automatically from the title of your Flickr photo, and then your Flickr name is added. I generally remove "by Liz Castro on Flickr", mostly because it takes up too much room. You can edit it as desired.The
img tag is what displays the image itself. The alt attribute will also display when visitors hover over the image but is overridden by the a tag's title attribute described in the previous paragraph. Why use both? The alt attribute is required for validation and also for Internet Explorer 5.It seems like rather a lot to get photos into your Blogger post, but I'm pretty sure it's the easiest and best way. Add a comment if you've got a better method.
(Earlier, I described how to use Flickr's Blog This button to add Flickr photos to your Blogger posts. In part 2 of this series, I showed how you could use Blogger's Insert Images button to add Flickr photos to your Blogger posts. The method that I prefer is the one described in the post you're reading now.)

No comments:
Post a Comment