Tuesday, December 23, 2008

I wish my grandma was on Facebook


Sept 12/86

Dear Liz

Hello and hope you are in the very best of health as for us we are doing just great at present.

Liz, am sending you the negatives from the pictures you took. They came out very nice. Thanks. Sorry I forgot to send it back. But you were away and then we have been busy with the Golden Agers. We have some real nice trips for them.

In fact a week from this Saturday we are taking 30 people to Hawaii for nine days and eight nights for $875. Not bad. Grandpa goes for nothing but I pay $775. It's still not bad for the two of us with some dinners and shows plus breakfast and the tour plus the airline. Boy I am glad we took this group job. It fits Grandpa and I really love it.

And when we come back we are taking a busload to Reno on the 7th and 8th of Oct. When we come back we are taking 20 persons to Epcot for eight days.

How was your Spain trip? Your Dad told me you were home and got a job. That is beautiful. best of luck and God bless you darling. We love you. Adios my dear Liz.

Love,
Grandpa and Grandma Rose Castro

Am sending you a good recipe for a custard pie. Try it you will love it. And put some cream on top (WOW) (WOW). Let me know if you make it.


Oct 16 1986

Dear Elizabeth:

Hello and hope you are doing OK. As for us we are just great at present.

Liz, how is the teaching? Are you teaching young or over 16 years old kids? Have not heard since you went to Spain. So I gather you must be more than busy. We are busy ourselves these days. We love this job we got with the Golden Agers. As a matter of fact we are leaving for Orlando, Florida this Saturday 18th at 530am in the morning from in fromt of the City Hall. We are taking 18 persons. We are looking forward to this nice trip.

Liz, did you get the card from Hawaii? I can't go anywhere and don't send my darlings a card so you know that I am thinking of you. I love you too much to forget my darlings.

Hope to see you sometime again. Will close for now. Adios my darling, keep well.

Love you,

Grandpa said I write everything so I don't leave anything for him. Ha ha for him.

love,
Grandma Rose and Grandpa John Castro


My Grandma Rose wrote me a letter almost every week of my life. I saved them all, even though practically every one focused on the most day-to-day details of her life: where they were going on a trip, who was visiting, who they were going to visit, if they were sick or healthy, what recipes she had tried. But it didn't matter that there was no (overt) philosophy or deeper discussions, what those letters offered was a portrait of my grandmother (and a glimpse of my grandpa). I loved getting them, and I cherish having them still.

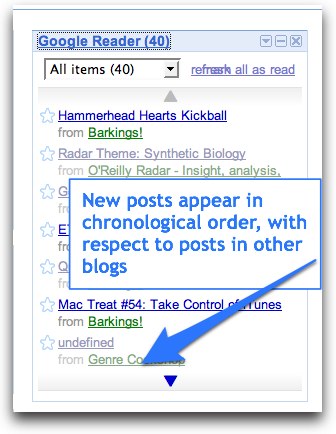
I've been thinking about them today after an interesting conversation I had with some friends last night about Facebook and why anyone should bother with it. I've only been on Facebook a week, but I mentioned that I've really been enjoying reading about the absolutely mundane things my friends are posting about: impending visits, weather reports, illness--precisely the same things my grandma wrote about.

It makes me think, also, of The Midwife's Tale: The Life of Martha Ballard, Based on Her Diary, 1785-1812, by Laurel Thatcher Ulrich. Martha Ballard was a midwife in New England at the turn of the 19th century who wrote in her journal every single day for 27 years. Sometimes her posts (!) were limited to weather reports, other times she detailed a difficult birth or a community gathering. But she was relentlessly steadfast, and the sheer regularity of her posts offer an almost complete description of herself and a thorough depiction of her life and of those who lived in her community. Had she lived in our time, she would have had a blog for sure.

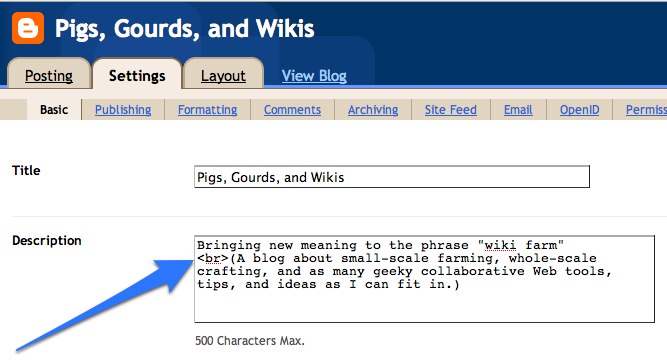
Why did Martha Ballard write every day? Why did my Grandma or my friends on Facebook? Why do I write this blog? And perhaps more importantly, why do we all write about such trivial details? This ties in with so many other thoughts about my life... the fact that I spend such a huge amount of time creating things that are much more easily bought (pork chops and pajamas come to mind). Or plowing the driveway, or planting a garden. Why spend time on these little things? I think because they are the essence of life. They are life. So, I think that's why it makes sense that I am interested in hearing about these things when my friends do them. It gives me a fuller picture of who they are to know that today they slept in but yesterday they took their daughter to see The Tale of Despereaux.

I only wish my grandma were still around so I could teach her how to update her status on Facebook.

Tuesday, November 18, 2008

Learning HTML in Chinese, or Spanish, or French, or...

My publisher sent me a Chinese edition of my HTML book today... I confess I wasn't quite sure what language it was just by looking at the cover:

My books in many languages

And I truly love seeing my books in different languages. I've always been interested in languages (apart from English, I speak Catalan, Spanish, French, and Italian, with varying success), so it's fun to see what the other languages look like, especially when I can sometimes pick out what they're talking about from the context. And I love seeing my screenshots and photographs translated:

HTML, XHTML, and CSS in other languages HTML, XHTML, and CSS in other languages HTML, XHTML, and CSS in other languages

My books have been translated into a lot of languages. (And that list isn't even up to date!)

But while I love to have one copy, my publisher usually sends me several.

So I'd like to share the extras with you. Hey, the holidays are coming. Maybe you know someone (or are someone) who would like one of my books in a foreign language. All you have to pay is the postage. USPS.com tells me it's $5 within the US, $10 for Canada and Mexico and $12 anywhere else.

OK, there's one more thing you have to do: something nice for someone else. You tell me what you've done, send me the postage (in cash or US stamps, please), and I'll send you the book.

(Want an English one? Read down to the very bottom.)

Here's what I've got left:

HTML, XHTML, and CSS, 6th edition: Czech (2), Chinese (2), and Spanish (3)
HTML 4th edition: French (2)
Creating a Web Page with HTML: Italian (2), German (2)

XML for the World Wide Web, 1st edition: Italian (2), French (1)

Publishing a Blog with Blogger: Italian (1), Swedish (2), French (1)

Perl and CGI, 2nd edition: Japanese (2)

If you're interested, leave me a comment with your email, or use my contact form.

And as a special bonus, I'll give the first person who can identify all three of the languages in the screenshots above any book of mine they like, postage paid, in English!

Tuesday, November 11, 2008

Birth of a Wiki

(Can't remember what a wiki is? Try here.)

So, I had this inspiration the other day (as I'm wont to do... it always seems so much easier to have inspirations than to make them into reality). The inspiration was to create a wiki about an as yet unnamed topic. Then I had another inspiration... to explain how I create the wiki as I go along.

The first step was to buy the domain name for the wiki. I want it to have a simple and memorable name, both so that people can remember it, and also so that people searching for my topic may happen upon it through Google or other search engines. My web host, Lunarpages, offers a domain registration service. I can simply go to my Control Panel and buy a new domain.

You can also register a domain at a big domain registrar like GoDaddy or Network Solutions. In that case, when you're buying the domain, make sure to specify the DNS servers of your web host. They tend to be a little sneaky about where to do such a thing since they'd really rather you host your site with them. Check out the tiny line below the main box with your info in it:

Setting Nameservers

Once you click the "click here to set nameservers" button, you'll see a set of fields for setting up to four nameservers. You get the numbers needed here from your web host. It's much easier and faster to set them right now than go back and edit them later.

Setting nameservers

I've been pretty happy with Lunarpages. I've been using them for a few years now and they not only have given very good service, but every few months they send me an email offering me additional services to my account, at no extra cost.

The most important of these has been free add-on domains. That means that I can host an unlimited number of domains at my one site at no extra cost. So, once I've bought a new domain, I go to my Control Panel at Lunarpages and create an add-on domain. That means Lunarpages creates a folder for me for the new domain. That folder will be the root directory for my new web site.

The trick of course isn't in the buying, but in the name choosing. You want a name that is concise and illustrative of the site's content. If the name has more than one word, it helps to choose words that don't mix together visually. Something like "talllemons" makes your visitors have to think about all those 'l's more than whatever "tall lemons" might be. Better to use something like "tallyellowfruit" so your visitors can quickly read the three words even though there are no spaces between them.

Once you've got a place for your wiki to live, you can start creating it. I'm really happy with PmWiki for small wikis. It's robust and popular, and doesn't use a database. That means setting it up is as easy as uploading files to the server. I can get a new wiki up in less than half an hour. Here's how.

Go to PmWiki and download the latest version of the software. I recommend choosing the latest stable release instead of the latest beta version.

Unzip the file on your computer. It'll look like this:

pmwiki-2.1.27

Now comes the hard part... upload (say, with Fetch or CuteFTP) all of those files to your Web Host server. I put them in the root directory of my new domain since I want the wiki to be the main page at that domain. To check if everything's working correctly, go to your browser and point it to the pmwiki.php script in your new domain (say, http://www.tallyellowfruit.com/pmwiki.php).

But don't stop there. You still have to initialize the wiki. On your computer, open the "sample_config.php" file. Check the PmWiki Initial Setup Tasks page to see the basic changes you should make to the configuration file. Especially important is that you immediately change the administrator password. I also set the name of my new wiki, and the time format.

Finally, if you want to set the wiki as the default page for your domain, create a text file with the following line:

<?php include('pmwiki.php');

Then save it with the name "index.php" and put it in the root directory of your domain.

Now test to see if it works by using your new domain name and nothing else (http://www.tallyellowfruit.com)

Next, we'll start to create the structure for the new wiki...

Saturday, November 08, 2008

Blogging Flickr photos (part 4)

The other day I got a comment on the third installment of this series asking how to wrap text around photos inserted in the manner I describe there.

It's a very good question. If you use either Flickr or Blogger's automatic tools, they do the wrapping for you. But if you insert images the way I recommend, in order to link to your Flickr site from your blog, then you'll have to wrap text around them (or center them) on your own.

Fortunately, it's not difficult. Start with part 3 of my tutorial on Blogging Flickr images manually.

In this example, we'll use a photo that is narrower than it is tall. We choose the Medium size on Flickr (289 x 500 pixels) and copy the automatically generated code for the image from box number 1.

Copy code for portrait oriented photo

Next, paste the code into your blog post:

paste code into blog post

Adjust the width (and remove the height) if necessary, as described in part 3. In this example, so we can really see the text wrap, I've reduced the width to 200 pixels and removed the height.

Next, after the width, add the following:

style="float:left; margin:0 10px 10px 0"

Don't forget the quotation marks at the beginning and at the end!

It should look like this:

add style to img tag

Rosie the Llama Now when you view the photo, the text that follows the image, and indeed anything else that follows the image, will wrap around to the right. Don't put anything but a space between the chunk of code and the following paragraph so that your text is aligned to the top of the image.

You can have the text wrap to the left of the image by using float:right. Remember the image floats to the side you tell it and the text goes around the other side.

You can adjust the space around the image by adjusting the values next to margin. The numbers refer to the number of pixels of space to the top, right, bottom, and left, in that order. (Start at the top and go clockwise.) So, if you float your image to the right (and the text goes to the left, you should use something like: margin: 0 0 10px 10px. Be sure to always specify px unless the number is 0.

These bits of code are CSS and are explained in detail in my book, HTML, XHTML, and CSS, Visual QuickStart Guide, Sixth Edition, published by Peachpit Press.

P.S. That's my llama! Her name is Rosie.

P.P.S. You can find the first three parts of this series on Blogging Flickr photos here, here, and here.

Friday, November 07, 2008

How to add comments to a blog post

My mom asked me the other day how to add comments to this blog. I realized it wasn't as straightforward as it should be to add comments to Blogger posts. So, I thought I'd give a quick tutorial here.

The most confusing thing is that on the main page of a blog, where several blog posts are listed at once, it's not at all obvious where to go to post a comment. In fact, it's downright hidden. But it's there if you know where to find it: It's the place that says the number of comments. Here's what it looks like on my blog:

Add comment

And here's what it looks like on fivethirtyeight, another Blogger-based blog:

Add comment 538

So, to add a comment, you click on the place where it says "0 comments" or "248 comments" or however many. And then you'll see something like this:

post comment box

If you just see a long list of comments, but no place to add yours, like on fivethirtyeight's site, then scroll on way down to the bottom until you see where it says "Post a comment":

Post a Comment 538

When you click "Post a comment" you get the box (like the one shown above on mine) where you can actually add the comment--though it's down at the bottom of the page.

post comment 538

Once you get here, you can add your comments in the box at the top (under Leave a comment). You can even add a bit of formatting... add <b> before and </b> after text you want bold, the same thing with the letter "i" if you want italics, and if you want to add a link, add <a href="the page's url here">the clickable text here</a> Be careful with all that punctuation, it's all required. (To get the URL of the page, just go there and copy the address from the bar at the top of your browser window.)

Some blogs require that you sign in, some don't. Some require you to have a Blogger account, some don't. It's all up to the person who creates the blog. (On this blog, you can post comments anonymously, though I moderate them all before making them public.)

One more thing, if you're viewing a blog post's individual page... perhaps you clicked there from the navigation bar on the right, or you followed a link from another site, you'll see the Post a comment link at the bottom of the post automatically.

Further, like fivethirtyeight, some people have set up their blogs so that when you click the "n comments" link, you go to the post's individual page, not the Leave a comment page. In that case, just scroll down to the bottom of the list of comments and find the Post a comment link. That'll always bring you to the "Leave a comment" box.

Sunday, November 02, 2008

iPhoto Book Themes

If you're a Mac user and an iPhoto fan, you've probably thought about printing out some of your photos in a book. I highly recommend it. Ever since my friend, Nancy Bea, lost 19,000 pictures when her computer got accidently bumped to the floor, I've been more and more convinced that the only good backup is a printout.

I always find it hard to choose an iPhoto theme... partly because Apple only shows you a very small portion of what the interior pages of any given theme might look like. Some themes let you have a lot of text, some don't let you have any, some let you have one or two photos per page, some let you have many more, even up to 32.

But how to tell which iPhoto theme is the one you want?

Use my handy iPhoto theme wiki! I give a detailed description of each theme, including use of text, and number of photos. Then I actually show you what each page of each theme can look like, depending on the orientation of the photos you choose.

iPhoto Book Themes site

Hopefully, you'll find that it's a helpful tool for making your iPhoto books. Hey, the holidays are coming.

You'll also note that this site was created with PmWiki... although it's not currently open to the public for editing, it certainly could be. I used the wiki software to make it easy to create a lot of connected pages without having to write all the code by hand.

Tuesday, October 21, 2008

Surveying my Fencing Needs with Google Earth

Fencing is no fun. The sheep are incredibly voracious. They almost rival the pigs. In less than a week, they've blown through about 2000 square feet of pasture, leaving it absolutely down to the ground. Luckily, they're enclosed in temporary electric mesh fencing ("electronet") which can be moved around.

And the cow and the goats have eaten all they have too. So we decided to try to put them together. That was not a good idea. The cow, mild mannered as she usually is, flipped out and chased the hysterical sheep around the paddock. The sheep were so scared they hurled themselves against the gates trying to get out.

So, we decided maybe they needed to be near each other without being totally together. We enclosed two areas side by side so they could graze near each other without being able to scare or be scared.

Sunday morning I found one of the goats in with the sheep (little whippersnapper) and two of the sheep out of the fence in the middle of the field. Not good. Even worse when our dog started to chase them around.

First job was to get the dog in the barn. Then, I moved the fences all around once more so that everyone had lots of new grass (which will probably pacify the sheep) and they are still next to each other so they can get used to each other before winter's closer quarters.

But the cow and goats don't really have enough room, so I want to think about getting more permanent fencing. But if you look at fencing web sites, they are impossible to understand. There are as many kinds of fencing as there are tools for making gourds :)

I called a local fencing dealer and they offered to give me recommendations and an estimate if I could provide a map of the area that I want to enclose. I had recently visited Kevin's Classroom and seen his YouTube video explaining how to use Google Earth's measuring tools.

GoogleEarth seemed like a perfect tool for measuring my fencing needs. Sure, I've used it to zoom around the earth, look at my house and those of my friends, but it can be used for so much more than that.

So first, I went on to Google Earth and typed in my address. Then I zoomed in on my field. One thing I can never remember is to how to stop it from zooming in and out. Just click in the middle of the map once the field is at the right magnification (e.g., as big as it can be while still fitting in your screen).

To use the measuring tools, click the Ruler in the toolbar. These screenshots are from the Mac version, but I can't imagine the Windows version is much different (comments welcome).

Google Earth's ruler tool

The Ruler box lets you choose between measuring a single straight line ("Line") or a path of connected straight lines ("Path"). You can see the results in a number of units, both metric and English, and even including smoots.

Google Earth's Ruler dialog box

To measure my prospective fencing, I use Path and Feet.

While the Ruler dialog box is active, there is also a cross-hairs icon in your map. Place it where you want to start measuring and click:

Google Earth icon

Click on the next point in the map to create the first leg of your path. In the Ruler box, you will begin to see the length of your path (201.55 feet in this example).

Google Earth path

Keep clicking around the field until you finish your path. If you need to move a point, hover over it with the mouse until it changes into a hand. Then drag it to the new desired position. You can Control-click a point to remove it (I suspect it's right-click on Windows).

Google Earth select point

Once you have the whole field encircled, check the path to see how much fencing you need (about 2024 feet in this example).

Google Earth measure

Cool, huh?

Monday, September 22, 2008

Blogging Flickr photos (part 3)

It seems crazy that I have now spent huge amounts of time explaining how to blog Flickr photos using two methods that I practicallly never use. The first method, using Flickr's Blog This button is great for blogging about a single photo when you don't need to add a lot of extra formatting. The second method, using Blogger's Insert Images button is best if you haven't already uploaded your photos or if you're not interested in linking them back to your Flickr site.

But the truth is, I want people who read my blog to go browse my Flickr images (and I want people who browse my Flickr images to read my blog :). While the first method described above will create a link to my photo's Flickr page, I can't deal with the limited formatting and only being able to include a single photo. So, I'll explain my favorite method of blogging Flickr photos.

First, go to the Flickr page of the first photo that you want to write about. Click the All Sizes button above the photo:

All Sizes button

On the Available Sizes page, choose the size with the width that is closest to the final size that you want to display the photo at. I'm going to display my photos 400 pixels wide, so I choose the Medium size which is 500 pixels wide.

Choose best size

A 500-pixel wide version of your photo will be displayed. Below the image itself, you'll find a chunk of HTML code that displays the image and creates a link to the image's Flickr page.

Copy Flickr code for Blogger

Copy that chunk of code.

Now, switch to Blogger and paste the HTML code into your post. Notice the width and height attributes near the end of the code.

Size of Flickr photo in Blogger

You can now adjust the width to the desired number of pixels (400 in our example). Get rid of the height attribute altogether; the height will be calculated by the browser automatically, depending on what you put in for width.

Change size of Flickr photo in Blogger

Why is there so much code there? The a tag is the link part that will bring visitors to your Flickr page when they click the image. The title attribute within the a tag displays descriptive text when your visitor hovers over the image. The text is generated automatically from the title of your Flickr photo, and then your Flickr name is added. I generally remove "by Liz Castro on Flickr", mostly because it takes up too much room. You can edit it as desired.

The img tag is what displays the image itself. The alt attribute will also display when visitors hover over the image but is overridden by the a tag's title attribute described in the previous paragraph. Why use both? The alt attribute is required for validation and also for Internet Explorer 5.

It seems like rather a lot to get photos into your Blogger post, but I'm pretty sure it's the easiest and best way. Add a comment if you've got a better method.

(Earlier, I described how to use Flickr's Blog This button to add Flickr photos to your Blogger posts. In part 2 of this series, I showed how you could use Blogger's Insert Images button to add Flickr photos to your Blogger posts. The method that I prefer is the one described in the post you're reading now.)

Sunday, September 07, 2008

Blogging Flickr photos (part 2)

The other day, I explained how to use Flickr's Blog This button. But unless I have a single photo to blog, and I don't want to add any links or formatting, I don't usually use Flickr's otherwise helpful "Blog This" button to blog about my photographs (or include photographs in my blog).

Blogger's Insert Images button, which you can find in the top part of the text box where you write your post is an easy way to add images to your blog.

Blogger's Insert Image button

To get started, click the Insert Images button. Your first task is to choose which image you want to insert. You can choose one from your computer by clicking on the Browse button or you can copy the URL of a photo out on the Web, for example, from Flickr.

Selecting an image from your computer is a simple way to get an image into your Blogger blog, but it has a couple of disadvantages. First, and foremost for me is that once you upload the image, it is somewhere on Blogger's servers. You can't edit, label, or tag the image, you can only replace it with another. And it's not easy to link to it from somewhere else, unless you upload it again following this same process. Still, if you don't have a Flickr account (or similar) to host your images, this is probably the easiest way to get them in your Blogger posts.

I do have a Flickr account though, so I want to enter the URL of my photo. Where do I find that URL?

First, view the image in Flickr. That URL up in the address bar will not do the trick unfortunately. (See how there's no ".jpg" extension at the end?)

Blog Flickr finding the URL

Next, click the "All Sizes" button, just above the image.

Flickr's All Sizes button

Which size should you use? The answer depends on how big you want the image to be in your blog post. Blogger will let you choose a display size of Small (200 pixels wide), Medium (320 pixels wide), or Large (400 pixels wide) and then will automatically resize your Flickr image accordingly. But since large images take longer to load than small ones (regardless of the size that you display them at), you want to choose the size that is larger than but as close as possible to the final display size. If you choose a Flickr size that is much smaller than the eventual display size, Blogger will increase its size automatically, and though it will load faster, it will end up pixelated and/or blurry.

Once you've chosen the optimum size (I usually choose Medium), scroll down below the image and copy the URL next to option 2:

Blogger Flickr get URL

Then paste the URL in the Upload Images box back in Blogger:
Blogger: Upload Images

Choose whether to flow the text around the image and on what side and choose whether the final display size should be Small (200 pixels wide), Medium (320 pixels wide), or Large (400 pixels wide).

Click Upload Image (which is a misnomer here since Blogger does not upload the image, but rather creates a link to the image that is already uploaded at Flickr).

The image is added to your blog post.

The advantage to using Blogger's Insert Images button is that it helps you size the image and flow the text around it without having to mess with the code.

You can, however, mess with the code if you're so inclined :)

Suppose you want more options than just Small, Medium or Large?

Once you've followed the steps above to add your image, click the Edit Html tab above the post box:

Blogger's Edit HTML tab

You'll see all the code that Blogger created for you in order to display your image at a particular size (and flow text around it). Slog through it until you see the Width information.

Blogger's code for displaying images

You can change that width to any number you like--in pixels.

Blogger change width of images

Remember to choose a display size that matches the Flickr size you chose as closely as possible.

You can find Part 1 of this article, where I talk about Flickr's Blog This button, here. My preferred way to insert Flickr images into Blogger posts is described in part 3 of this article. In part 4, I'll show you how to wrap text around images inserted this way.

Saturday, September 06, 2008

Embedding an Already Embedded YouTube Video

What do you do when you see a YouTube video and you want to either send someone a link to it, or embed it in your own page? It's easy if you're viewing the movie right at the YouTube site. You can find the link you need to copy in the address bar:

Link to YouTube

and the code to embed the video in your blog post or Web site is over in the right-hand column:

Embed YouTube

But what do you do if you've found an embedded YouTube video on someone else's blog or Web site? Normally, you'd right-click (or Control-click) to copy the URL, but that won't work in this case, you'll get the menu options for the Flash Player, which won't be helpful.

Control click on YouTube video

What you have to do is hover over the small upward arrow in the lower-right corner of the embedded Video until the Links icon appears:

Link menu in embedded YouTube

Then click the Links icon and the video itself will shrink into the upper-left corner, while the code for Embedding the video and also for linking to it will appear on the right-hand side. Simply copy it to your blog post or Web page and you're all set.

Embedding or linking to an embedded video

Sunday, August 31, 2008

Blogging Flickr photos (part 1)

My most popular image on Flickr is, sadly, not one of my photographs. It's a screenshot from an old blog post about how to include images from Flickr in Web pages. But the number of views it's gotten (currently just under 4000), along with my latest photo blogging, makes me think it's time to reprise and indeed expand my article so that it covers adding images from Flickr to blog posts (especially, but not exclusively) created with Blogger.

There are lots of ways of adding images from Flickr to your Blogger posts. The easiest, but least flexible, is by using Flickr's tools to blog your photos. First, tell Flickr where you are blogging. You can choose from a few layouts by clicking the Layout link next to your blog name. Then, when you want to blog about a photo from your Flickr stream, click the "Blog This" button above the desired photo:

Flickr's Blog This button

You'll then get a menu where you can choose the blog that you want to post to, and then two fields next to a small version of your photo. In the first will be the current title of the selected photo. This will be the Subject of your blog post. In the second will be where you can write your blog entry:

Blogging from Flickr

Fill in the fields, click Post Entry and your new post will almost magically appear over on your blog.

If you want to blog about a single photo, this method is all right, but it falls down hard if you want to add any additional photos or formatting. Unfortunately, you are limited to writing a plain text entry, and you can't add labels either. These are big negatives for me and so I almost always use a different method, which I explain in part 2 (about Blogger's Insert Images button) and part 3 (about adding the code manually--my preferred technique).

In part 4, I'll show you how to wrap text around your Flickr images that link to Flickr.

Thursday, August 21, 2008

Non-breaking spaces in FileMaker Pro

One of my quirks is a lifelong love affair with databases (which many would put in the same category as bowling and prunes). Today I was working on a mail merge system for a local non-profit, and I needed a non-breaking space in my letter to keep "July" and "27" on the same line. It's Option-Space. It doesn't show up in my Calculation field, but when I browse the letters, my date stays together and looks much better.

Wednesday, August 20, 2008

Little Brother

Just finished reading Cory Doctorow's new book, Little Brother, about a teenage's boy's fight against an excessive crackdown by the Department of Homeland Security after a terrorist attack in San Francisco. I read a negative review on Amazon which rightly complained about the cookie cutter bad guys and lack of evidence that our hero is such a great hacker, but I still think they sort of missed the point.

As I've been worrying about the world and dread reading the news, I am often given hope by hackers and visionaries who might have looked like the protagonist when they were a few years younger. These are people who hold dear the ideals on which this country was founded--rights to privacy, freedom of press, expression, assembly, religion, and to be treated fairly and equally before the law--and who have the technological power to defend them. I love passing that hope on to my daughter when she asks me, "Why do they do that?" in response to the news of some corrupt government official.

She's actually the intended audience for this "young adult" book, and she really liked it, calling it "very intense". I highly recommend reading it yourself and then sharing it with your kids. We need to have hope.

Sunday, August 17, 2008

Country Bumpkin in the Big City

Yesterday, my old Nokia phone finally refused to charge. Of course, I was sort of pleased, since that was the last obstacle between me and an iPhone... This morning, I decided to drive down to the Apple store. As I was getting dressed, I looked at the pants that I was putting on and noticed the specks of grass that were still on them from when I weed-whacked around the pig fence yesterday afternoon. It made me feel like a country bumpkin on my way to the big city.

The strange thing was I kind of liked the feeling. I also like being a technology addict here in my small town. And I realized I also like being an American in Barcelona, and a Catalan in the US. I often worry that I don't quite fit in, but maybe it's because I don't completely want to; there are these big important parts of me that stick out, that I like having stick out. I remember when I was little, my sisters would tease me for watching bowling on TV and eating prunes (back before they were dried plums). These were things most 8-year-olds didn't do, but they were totally me.

And I suppose the only reason it's curious is because I spend a fair bit of time wondering if I belong anywhere, and often feel a bit like an alien. Probably much of the problem is imagining that anyone could fit in a box labeled "country bumpkin" or "technology addict"; no-one is that one-sided. But I do think that part of my alienation (though that's a strong word) comes from liking very disparate things: sewing and PHP, bowling and local food, politics and pumpkins.

Thursday, August 14, 2008

So, what is a Wiki anyway?

It has not escaped my attention that, despite the name of my other blog, there has been not a single entry about wikis since I started writing two weeks ago. Part of the reason is that I was spending an awful lot of time creating a movie for the Ashfield Film Festival, but the most important reason is that I wasn't sure how to start. Perhaps an introduction will do the job.

Readers, meet wikis, wikis, meet readers.

Let me tell you a little about wikis. The name is the most intimidating part, but has the best story. The guy who developed the first wiki software, Ward Cunningham, named his invention after the Wiki Wiki shuttle bus at Honolulu Airport. Wiki is Hawaiian for "fast". But fast only tells part of the story. There are two more things about wikis that make them really valuable tools.

First, wikis can be used to create web pages collaboratively. Wikipedia is a prime example. You, me, and the postman can go on to Wikipedia and add or edit the web pages that are there, thanks to the wiki software that Wikipedia runs on.

But wikis don't have to be a joint effort. I've been using them to create Web sites for friends and family members, like, for example, my Dad's painting site. The advantage is that a wiki is incredibly easy to edit, which means that once it's designed and set up, it's easy for the Web site owner, like my Dad, to update the information on his own Web site, create new pages and links between pages, and more, without knowing HTML, and without having to upload pages through FTP.

So, again, what is a wiki? It's a web site generated with wiki software (like MediaWiki or PmWiki) that can be edited collaboratively. Once the web site (often called a wiki) is set up, pages can be created and/or edited without any knowledge of HTML or FTP.

Tuesday, August 12, 2008

My new "semi-personal" blog

I wanted to invite you all to visit my new blog, Pigs, Gourds, and Wikis. The name comes from the three big interests in my life right now:
  • pigs (but we also have chickens, goats, rabbits, lots of cats, a big huge dog, a similarly sized cow, and a very large pumpkin and gourd patch),
  • gourds (actually, I love most crafts, I even consider HTML a craft... it's just another way of making things with your hands. Apart from carving gourds, I'm also very into sewing and knitting),
  • and wikis (or anything technical. I'm embarrassed to admit that to date there's not a single entry about wikis, though I mean to get there, but there are other geeky, troubleshooting related posts).

I hope you enjoy it!

Widescreen movies in QuickTime
or, Happy Birthday, Cecil

It's a little known fact that Cecil B. Demille was born while his parents were vacationing in Ashfield, Massachusetts on August 12, 1881. Perhaps for that reason, or more probably because it was a lucky excuse, a group of Ashfield residents began the Ashfield Film Festival, whose deadline for submissions is, not surprisingly, August 12. That's today.

I finished my movie yesterday morning and spent the better part of the day insisting that FinalCut really export it in widescreen format, that iDVD really keep it in widescreen format, and that my projector really display it in widescreen format. The best tips I found were from a post on Apple's iDVD support forum which referenced this article.

Basically, even though you've shot and edited your movie in widescreen format, you have to follow a special process to keep it widescreen in QuickTime. First, export the movie as a standalone QuickTime Movie (not using QuickTime Conversion). Then open that movie with QuickTime player and, through the Movie Properties box (Command-J), change the movie's size to 853 x 480 pixels. Save the changes and then you're ready to import it into iDVD. Don't forget to check the widescreen option in iDVD when you begin your project.

Oh, and if you want to see my movie, come to the Ashfield Film Festival, 7pm, September 20th. You'll also be able to see all of the movies on YouTube sometime after the festival. I'll be sure and post a link here.

Thursday, August 07, 2008

Line breaks in Blogger Blog titles

I just changed the "Description" of my other blog, that bit that goes right under the title. If you have your own blog, you may have noticed that Blogger controls the line breaks in your description. Even if you add a regular line break, the lines all flow together when you go to view your blog.

But I wanted Bringing new meaning to the phrase "Wiki Farm" to be on its own line.

The answer? Add <br> (which is the HTML code for a line break) where the new line should begin.

Line breaks in Blogger Blog titles

As you can see at the top of this very page, the rest of my description starts on its own line, just as I wished.

Tuesday, August 05, 2008

Subscribing to a blog

I've been talking and thinking about blogs a lot. I thought I only read two: O'Reilly Radar, which is a technical blog about "insight, analysis and research about emerging technologies" and Zeldman.com which is a blog written by Web design and standards guru, Jeffrey Zeldman. But each day when I go to my personalized Google page, I am reminded that I am subscribed to a few more than two. I don't actually read every post every day, but by having new posts appear on my iGoogle page, I can see which ones I want to read and skip the ones I don't have time for.

Why subscribe to a blog? I am just not the kind of person to remember to go to different sites and see if there's something new. By subscribing to a blog, I can see when there is a new post, and even read that post (or sometimes an excerpt of it) without going anywhere special (or remembering any addresses).

There are stand-alone programs (RSS readers) that let you follow blog posts, but for me it's easier just to use Google Reader and have the blogs appear on my iGoogle page. I realized that I wasn't yet subscribed to my friend Nancy Bea's blog, so I thought I'd walk you all through it...

An iGoogle page is a personalized Google page. Besides searching the Web, I use mine to see new pictures from my friends' Flickr accounts, check my Calendar, look at weather reports, follow news articles, read the comics, and finally, follow blogs with Google Reader. If you have a Google Account, you can set up an iGoogle page of your own. From Google's main page, click Sign in in the upper right corner:

Google, signin

Next, enter your user name and password. Then click iGoogle, also in the upper right hand corner:

go to igoogle

If you don't have Google Reader on your iGoogle page, just click the "Customize this page" link at the top right to add it.

customize

Just type "Google Reader" into the Search for gadgets box and when Google Reader comes up, click the Add it now button under its logo:

add google reader

Here's what my iGoogle page looks like:

my iGoogle page

As you can see above, my Google Reader is in the top right corner. You can see the title of each new post along with the name of the blog that it comes from. I have it configured so that when I click on a post name, the post is expanded in a bubble:

Read new post-1

Some blogs let you read the entire post right here, photos and all. Others (like Zeldman's) only give you a brief excerpt and you click "Show original item" if you want to jump to the blog in question. (Configure your iGoogle gadgets by clicking the down arrow next to their names.)

OK, so how do we add a blog?

First, navigate to the blog you want to subscribe to.

genre cookshop, top-1

Next, find the Subscribe link or button. Nancy Bea doesn't have a "Subscribe" button per se, but down near the bottom of the page, you can find a little "atom.xml" link. That'll work too. Anything that says "atom", "RSS", "feed", or "Subscribe" should do the trick. In this case, we'll click that atom.xml link.

Genre Cookshop.atom-1

You'll jump to a page that displays the "feed" for the blog, that is, what is sent to subscribers.

Because of its extension, Firefox understands that it's a feed and asks if you want to subscribe. (I haven't tested this yet with Explorer, but I'll try to.) Choose Google from the "Subscribe to this feed using" menu and then click Subscribe Now.

Genre Cookshop subscribe-1

Google asks if you'd rather add the blog to your homepage or to Google Reader. If you want to see all the posts from a particular blog in one section on your iGoogle page, choose Add to Google homepage. I want all my blogs together in one section of my iGoogle page, so I choose Add to Google Reader.

Add to Google

You'll be transferred to Google Reader where you can adjust your settings, if necessary. (I didn't do anything here.)

When you next go to your iGoogle page, you'll see Nancy Bea's latest post in your Google Reader. It won't necessarily be up at the top of the list, since all your posts are in chronological order:

Google Reader, after

I'm also not sure why the title of her most recent post "More travels" did not appear here. It maybe the way the feed was constructed.

I have a pretty standard Subscribe button on this blog. Let's see if it works the same way.

So, navigate to my blog... oh, you're here already :)

My Subscribe buttons are below the labels. Click the Posts pop-up menu and then click "Add to Google".

Subscribe posts

This time we go straight to the choice between adding it directly to my iGoogle page or to Google Reader. I'll choose Google Reader again.

Add to Google-2

Next time you view your iGoogle page, you'll see the latest posts from my blog!

pgw recent posts-1

Let me know if that all makes sense and if it works in your browser.

My Books