Tuesday, November 18, 2008

Learning HTML in Chinese, or Spanish, or French, or...

My publisher sent me a Chinese edition of my HTML book today... I confess I wasn't quite sure what language it was just by looking at the cover:

My books in many languages

And I truly love seeing my books in different languages. I've always been interested in languages (apart from English, I speak Catalan, Spanish, French, and Italian, with varying success), so it's fun to see what the other languages look like, especially when I can sometimes pick out what they're talking about from the context. And I love seeing my screenshots and photographs translated:

HTML, XHTML, and CSS in other languages HTML, XHTML, and CSS in other languages HTML, XHTML, and CSS in other languages

My books have been translated into a lot of languages. (And that list isn't even up to date!)

But while I love to have one copy, my publisher usually sends me several.

So I'd like to share the extras with you. Hey, the holidays are coming. Maybe you know someone (or are someone) who would like one of my books in a foreign language. All you have to pay is the postage. USPS.com tells me it's $5 within the US, $10 for Canada and Mexico and $12 anywhere else.

OK, there's one more thing you have to do: something nice for someone else. You tell me what you've done, send me the postage (in cash or US stamps, please), and I'll send you the book.

(Want an English one? Read down to the very bottom.)

Here's what I've got left:

HTML, XHTML, and CSS, 6th edition: Czech (2), Chinese (2), and Spanish (3)
HTML 4th edition: French (2)
Creating a Web Page with HTML: Italian (2), German (2)

XML for the World Wide Web, 1st edition: Italian (2), French (1)

Publishing a Blog with Blogger: Italian (1), Swedish (2), French (1)

Perl and CGI, 2nd edition: Japanese (2)

If you're interested, leave me a comment with your email, or use my contact form.

And as a special bonus, I'll give the first person who can identify all three of the languages in the screenshots above any book of mine they like, postage paid, in English!

Tuesday, November 11, 2008

Birth of a Wiki

(Can't remember what a wiki is? Try here.)

So, I had this inspiration the other day (as I'm wont to do... it always seems so much easier to have inspirations than to make them into reality). The inspiration was to create a wiki about an as yet unnamed topic. Then I had another inspiration... to explain how I create the wiki as I go along.

The first step was to buy the domain name for the wiki. I want it to have a simple and memorable name, both so that people can remember it, and also so that people searching for my topic may happen upon it through Google or other search engines. My web host, Lunarpages, offers a domain registration service. I can simply go to my Control Panel and buy a new domain.

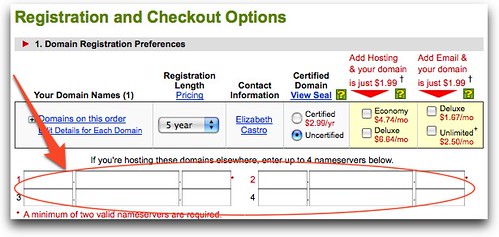
You can also register a domain at a big domain registrar like GoDaddy or Network Solutions. In that case, when you're buying the domain, make sure to specify the DNS servers of your web host. They tend to be a little sneaky about where to do such a thing since they'd really rather you host your site with them. Check out the tiny line below the main box with your info in it:

Setting Nameservers

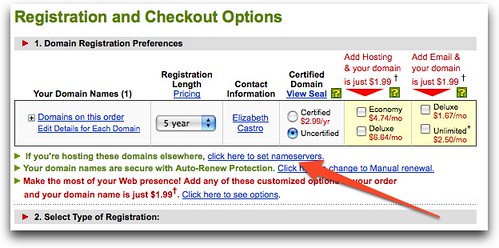
Once you click the "click here to set nameservers" button, you'll see a set of fields for setting up to four nameservers. You get the numbers needed here from your web host. It's much easier and faster to set them right now than go back and edit them later.

Setting nameservers

I've been pretty happy with Lunarpages. I've been using them for a few years now and they not only have given very good service, but every few months they send me an email offering me additional services to my account, at no extra cost.

The most important of these has been free add-on domains. That means that I can host an unlimited number of domains at my one site at no extra cost. So, once I've bought a new domain, I go to my Control Panel at Lunarpages and create an add-on domain. That means Lunarpages creates a folder for me for the new domain. That folder will be the root directory for my new web site.

The trick of course isn't in the buying, but in the name choosing. You want a name that is concise and illustrative of the site's content. If the name has more than one word, it helps to choose words that don't mix together visually. Something like "talllemons" makes your visitors have to think about all those 'l's more than whatever "tall lemons" might be. Better to use something like "tallyellowfruit" so your visitors can quickly read the three words even though there are no spaces between them.

Once you've got a place for your wiki to live, you can start creating it. I'm really happy with PmWiki for small wikis. It's robust and popular, and doesn't use a database. That means setting it up is as easy as uploading files to the server. I can get a new wiki up in less than half an hour. Here's how.

Go to PmWiki and download the latest version of the software. I recommend choosing the latest stable release instead of the latest beta version.

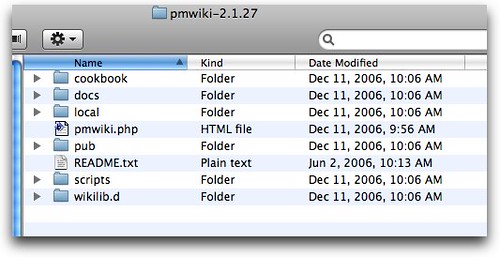
Unzip the file on your computer. It'll look like this:

pmwiki-2.1.27

Now comes the hard part... upload (say, with Fetch or CuteFTP) all of those files to your Web Host server. I put them in the root directory of my new domain since I want the wiki to be the main page at that domain. To check if everything's working correctly, go to your browser and point it to the pmwiki.php script in your new domain (say, http://www.tallyellowfruit.com/pmwiki.php).

But don't stop there. You still have to initialize the wiki. On your computer, open the "sample_config.php" file. Check the PmWiki Initial Setup Tasks page to see the basic changes you should make to the configuration file. Especially important is that you immediately change the administrator password. I also set the name of my new wiki, and the time format.

Finally, if you want to set the wiki as the default page for your domain, create a text file with the following line:

<?php include('pmwiki.php');

Then save it with the name "index.php" and put it in the root directory of your domain.

Now test to see if it works by using your new domain name and nothing else (http://www.tallyellowfruit.com)

Next, we'll start to create the structure for the new wiki...

Saturday, November 08, 2008

Blogging Flickr photos (part 4)

The other day I got a comment on the third installment of this series asking how to wrap text around photos inserted in the manner I describe there.

It's a very good question. If you use either Flickr or Blogger's automatic tools, they do the wrapping for you. But if you insert images the way I recommend, in order to link to your Flickr site from your blog, then you'll have to wrap text around them (or center them) on your own.

Fortunately, it's not difficult. Start with part 3 of my tutorial on Blogging Flickr images manually.

In this example, we'll use a photo that is narrower than it is tall. We choose the Medium size on Flickr (289 x 500 pixels) and copy the automatically generated code for the image from box number 1.

Copy code for portrait oriented photo

Next, paste the code into your blog post:

paste code into blog post

Adjust the width (and remove the height) if necessary, as described in part 3. In this example, so we can really see the text wrap, I've reduced the width to 200 pixels and removed the height.

Next, after the width, add the following:

style="float:left; margin:0 10px 10px 0"

Don't forget the quotation marks at the beginning and at the end!

It should look like this:

add style to img tag

Rosie the Llama Now when you view the photo, the text that follows the image, and indeed anything else that follows the image, will wrap around to the right. Don't put anything but a space between the chunk of code and the following paragraph so that your text is aligned to the top of the image.

You can have the text wrap to the left of the image by using float:right. Remember the image floats to the side you tell it and the text goes around the other side.

You can adjust the space around the image by adjusting the values next to margin. The numbers refer to the number of pixels of space to the top, right, bottom, and left, in that order. (Start at the top and go clockwise.) So, if you float your image to the right (and the text goes to the left, you should use something like: margin: 0 0 10px 10px. Be sure to always specify px unless the number is 0.

These bits of code are CSS and are explained in detail in my book, HTML, XHTML, and CSS, Visual QuickStart Guide, Sixth Edition, published by Peachpit Press.

P.S. That's my llama! Her name is Rosie.

P.P.S. You can find the first three parts of this series on Blogging Flickr photos here, here, and here.

Friday, November 07, 2008

How to add comments to a blog post

My mom asked me the other day how to add comments to this blog. I realized it wasn't as straightforward as it should be to add comments to Blogger posts. So, I thought I'd give a quick tutorial here.

The most confusing thing is that on the main page of a blog, where several blog posts are listed at once, it's not at all obvious where to go to post a comment. In fact, it's downright hidden. But it's there if you know where to find it: It's the place that says the number of comments. Here's what it looks like on my blog:

Add comment

And here's what it looks like on fivethirtyeight, another Blogger-based blog:

Add comment 538

So, to add a comment, you click on the place where it says "0 comments" or "248 comments" or however many. And then you'll see something like this:

post comment box

If you just see a long list of comments, but no place to add yours, like on fivethirtyeight's site, then scroll on way down to the bottom until you see where it says "Post a comment":

Post a Comment 538

When you click "Post a comment" you get the box (like the one shown above on mine) where you can actually add the comment--though it's down at the bottom of the page.

post comment 538

Once you get here, you can add your comments in the box at the top (under Leave a comment). You can even add a bit of formatting... add <b> before and </b> after text you want bold, the same thing with the letter "i" if you want italics, and if you want to add a link, add <a href="the page's url here">the clickable text here</a> Be careful with all that punctuation, it's all required. (To get the URL of the page, just go there and copy the address from the bar at the top of your browser window.)

Some blogs require that you sign in, some don't. Some require you to have a Blogger account, some don't. It's all up to the person who creates the blog. (On this blog, you can post comments anonymously, though I moderate them all before making them public.)

One more thing, if you're viewing a blog post's individual page... perhaps you clicked there from the navigation bar on the right, or you followed a link from another site, you'll see the Post a comment link at the bottom of the post automatically.

Further, like fivethirtyeight, some people have set up their blogs so that when you click the "n comments" link, you go to the post's individual page, not the Leave a comment page. In that case, just scroll down to the bottom of the list of comments and find the Post a comment link. That'll always bring you to the "Leave a comment" box.

Sunday, November 02, 2008

iPhoto Book Themes

If you're a Mac user and an iPhoto fan, you've probably thought about printing out some of your photos in a book. I highly recommend it. Ever since my friend, Nancy Bea, lost 19,000 pictures when her computer got accidently bumped to the floor, I've been more and more convinced that the only good backup is a printout.

I always find it hard to choose an iPhoto theme... partly because Apple only shows you a very small portion of what the interior pages of any given theme might look like. Some themes let you have a lot of text, some don't let you have any, some let you have one or two photos per page, some let you have many more, even up to 32.

But how to tell which iPhoto theme is the one you want?

Use my handy iPhoto theme wiki! I give a detailed description of each theme, including use of text, and number of photos. Then I actually show you what each page of each theme can look like, depending on the orientation of the photos you choose.

iPhoto Book Themes site

Hopefully, you'll find that it's a helpful tool for making your iPhoto books. Hey, the holidays are coming.

You'll also note that this site was created with PmWiki... although it's not currently open to the public for editing, it certainly could be. I used the wiki software to make it easy to create a lot of connected pages without having to write all the code by hand.

My Books