Monday, November 30, 2009

Why is position:relative necessary when you're positioning absolutely?

So I'm reading Dan Cederholm's new book, Handcrafted CSS: More Bulletproof Web Design. I'm really liking it.

There is a small example in the intro that deals with absolute positioning that I want to highlight. He's talking about formatting a list of coffee drinks that have a title and a price. The goal is to have the link be the entire line so that it makes it easy for readers to click on their desired cup of coffee.

The original code looks like this:

<ul class="lst">   
<li><a href="#"><em>2.79</em> Latte</a></li>
<li><a href="#"><em>2.99</em> Cappuccino</a></li>
<li><a href="#"><em>1.80</em> Cafe Americano</a></li>
<li><a href="#"><em>2.00</em> Espresso</a></li>
<li><a href="#"><em>10.49</em> Caramel Macchiato</a></li>
</ul>


Cederholm suggests using absolute positioning, with code much like the following (his is part of a larger web page and so I've adjusted it to appear on its own):

ul.lst li {
     list-style-type:none
     }

ul.lst li a   {
     position: relative;
     display:block;
     padding: 7px;
     border-bottom: 1px solid #f3f2e8;
     width:200px;
     text-decoration:none;
     font: .9em Verdana;
     }
    
ul.lst li a:hover {
     background-color:#e0e0e0;
     }
   
ul.lst li a em  {
     position: absolute;
     right: 7px;
     top: 7px;
     font-style:normal;
     }


The result can be seen here.

And though Cederholm says the position:relative line is necessary, he doesn't explain why. The reason is that when you position an element absolutely—in this case the coffee prices, which are em elements—their position is calculated with respect to the nearest positioned ancestor, or if there is none, to the body element. Since he wants the prices to go in the same line as the a element that contains them, he must position the a element. By adding position:relative to the definition for the a element, it becomes positioned, and any descendants that are absolutely positioned will be positioned relative to it. This happens even though he's not defining any offsets; that is, the a elements stay in their natural place in the flow.

You can find more information about relative and absolute positioning on pages 178-179 in my HTML, XHTML, and CSS, Sixth Edition: Visual QuickStart Guide.

Also note that Cederholm concludes this example by showing how absolute positioning is not very flexible for text elements. That is, when the text is enlarged, the name of the coffee and its price overlap each other. Instead, absolute positioning makes more sense if one of the pieces is a static image whose size can always be accounted for.

Monday, November 02, 2009

Publishing a Blog with Blogger: Visual QuickProject Guide, Second Edition

Publishing a Blog with Blogger: Visual QuickProject Guide, Second Edition, coverHot off the presses, I got mine today.

This brand new Second Edition of Publishing a Blog with Blogger: Visual QuickProject Guide is completely updated and covers all of Blogger's great new features for writing, designing, and earning money from your blog. Perhaps the most important of these is the ability to add new page elements (or widgets) to your blog, and then customize and reorder them to make your blog look and act just like you want it to. You can use these new widgets to add blog rolls, slideshows, search boxes, polls, tag clouds, custom HTML or JavaScript, and many other elements. This book will show you how.

You'll also learn how to use Google's visitor tracking tools to see how many people visited your blog, what they looked at, and where they came from—even what they typed to find you. You can use this information to better assess how effective your blog posts are and what your readers are interested in. And then you'll learn how to add Google ads to your blog with AdSense to earn money from your writing.

The great thing about Visual QuickProject Guides is that they show you—through copious illustrations—just what you have to do, without bogging you down in lengthy explanations. Here's what a sample spread looks like (click to download the PDF):


Sample spread of Publishing a Blog with Blogger: VQJ, Second Edition

Tuesday, September 15, 2009

Formatting Blogger's Read More

As part of Blogger's 10th anniversary celebration, they announced last week that they had added an easy Read More feature to their popular blogging software. The Read More feature (also called a jump break) lets you limit the amount of a long post that will appear on your main page, and offers a link to the rest of your post for those who want to, well, read more. The Read More feature lets your visitors see the beginnings of several different posts at once instead of having to scroll through very long posts to see what else there is.

Using the Read More feature is really easy. First, make sure you're using the new Compose tab, as I described in Blogger's new post editor last month. Then, place your cursor in your 

Monday, September 14, 2009

Monetizing my blog

Or not. It's mostly an experiment. I'm working on the second edition of my Blogger book, and I'm trying to figure out how to help people make their blogs a money-making proposition. Of course, Google/Blogger have this AdSense program that places supposedly-relevant ads on a blog, but every time I see a page filled with those ads, I automatically think they're trying to scam me. So, I'm wondering a couple of things. Are there real blogs with useful content that include Google AdSense ads? And do the ads generate income for these folks? If you know the answer, I'd sure love to hear it.

Back in February, I wrote a Web site documenting every possible layout of an iPhoto Book.  At one point, it got mentioned in TidBITS, and I was getting several hundred hits a day, quite a lot more than normal. It's leveled off quite a

Wednesday, September 09, 2009

Random tip: Mousing Leftward (Updated)

Some of my most useful tips (to me anyway) come from mistyping or being clumsy on the keyboard. The other day there was something leaning on my shift key while I was using the roller on my mouse and lo and behold, I scrolled sideways instead of up and down. Cool! I'm not sure if that's mouse-specific (mine's a wireless Logitech), but I thought I'd pass it on.

Updated!!
Hmm. It looks like the left-right mouse scrolling is at least application dependent. In Firefox, Shift makes the mouse scroll wheel go left and right (instead of the default up and down), but in InDesign CS4, the Shift key super-charges the scrolling wheel so you scroll faster, but still up and down. The Option key plus mouse scroll zooms in and out, and the Command key finally makes the mouse wheel scroll left and right. I can't find a place where you can change these mappings.

Tuesday, September 08, 2009

Logging into multiple accounts at the same time

The other tip I've been wanting to share is about dealing with multiple accounts. For example, for this new version of my Blogger book, I've created an example blog written by the fictional Sarah Cookwood. She has her own Google/Blogger account. But if I'm blogging from her point of view and blogging my own blog at the same time, I end up doing a lot of logging in and out.

Another situation where this might be an issue is if you share a computer with a partner or sibling. You log into your Gmail account and check your mail. Fine. But then the other person comes along and wants to log in. Again, there's a lot of logging in and out.

My solution is to use two different browsers... for example, Sarah can log in with Firefox and I can log into Safari. We can both stay logged in and let the browsers keep our accounts separate. If you're on Windows, one of you could use Firefox and the other Opera, (OK, or Internet Explorer).

You could do the same thing with Facebook, Twitter, or any other site that you need to log into with more than one account.

Friday, August 28, 2009

Blogger's new post editor

As I was working on a new chapter for my upcoming second edition of Publishing a blog with Blogger: Visual QuickStart Guide I happened to be wandering about the Settings area of my example blog (Go to your Dashboard, choose Settings | Basic and scroll down almost to the bottom.) And there was this option I'd never seen before: "Updated editor: Check out the latest features".

Blogger's new post editor

I checked the radio button, saved my settings, and went directly to write this post. The thing I like best is the little resize box in the bottom

Wednesday, August 26, 2009

Cross posting from Pigs, Gourds, and Wikis

So, I've decided to cross post my technical articles from Pigs, Gourds, and Wikis here as well. You can use the labels cloud to find them (click on Tech or Tips). They have the same dates as when they were originally published on my other blog.

Labels in Blogger blogs viewed as a Cloud

Blogger Labels List If you viewed my other blog last week, you would have seen a rather unwieldy, definitely endless list of labels like the one shown at left. Labels are Blogger's way of helping you categorize your blog posts so that readers can jump to an entire set of posts of interest. However, as the list gets longer, and disappears off the bottom of the screen, it also gets a lot less useful.

Of course, the first problem is that it's not easy to label your posts effectively in the heat of the moment. For example, I have a number of labels for the individual animals on our farm, where really it would probably be a lot more useful to have a single "animals" label. You can go back and edit your labels either at the Dashboard or by editing individual posts. I'll leave that up to you.

Blogger, for its 10th anniversary, has been rolling out some lovely new features, including the ability to display a cloud of labels. This means that your labels will be shown in various sizes, depending on how often you've used them. It gives your readers a clear, visual way to see which topics you visit most often on your blog--and which topics you visit only occasionally.

And since the label cloud is formatted not as a list but as a short

Thursday, August 20, 2009

How to create a Flickr slideshow (on Blogger) of any set of photos you want

Or, how to customize Blogger's Slideshow gadget...

Or, how to add an RSS Feed to a Blogger Slideshow...

Oh you say, you can do that really easily by going to Flickr, setting up a set of photos and then choosing Slideshow, and then clicking Share. Poof, there's your embed code, no problem.

Hmm. But that doesn't fit in a Blogger sidebar. Nor does it start automatically. It's not nearly as nice as Blogger's Slideshow gadget.

So how do you get Blogger's Slideshow gadget to show only the photos from a particular Flickr set? Maybe you have several different blogs and you want each one to feature photos from a different set on Flickr.

If you choose Flickr in Blogger's Slideshow gadget, you can then choose a Flickr username or a keyword, but not both.

The answer lies in Flickr RSS feeds.

An RSS feed is way of subscribing to an often-changing Web site, like a blog, or a frequently updated Flickr set. It's a text file, and generally you link to it by referencing its URL.

Flickr automatically creates RSS feeds for your entire photostream, for each of your photo sets and groups, for your contacts' photos, even for each tag. You can also customize an RSS feed to include only those photos from a particular person with a particular tag.

Once you find (or customize) the Flickr RSS feed that includes the photos you want, you'll add it to the Blogger Slideshow gadget. You'll also need a bit of extra code, which I'll explain shortly.

Let's begin by using the RSS feed from a particular photo set. Go to Flickr and display the desired set. It can be a set that you created, or a set that someone else created. The RSS feed will only include public photos.

When you display a set, you'll see the index photo for the set to the left, and thumbnails of each photo in the set in a group to the right.

Viewing a set

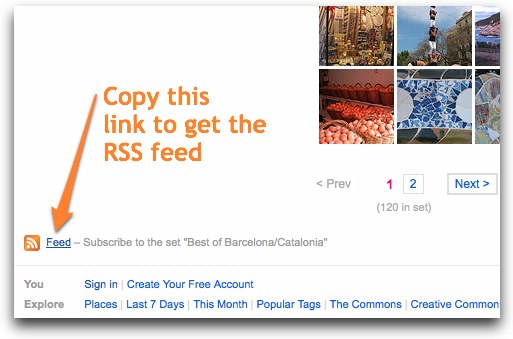
Scroll down to the bottom of the page until you see the RSS feed icon:

RSS feed link

Right-click (on Windows) or Control-click (on a Mac) the Feed link and choose Copy Link Location (or whatever your browser calls it). You've now got most of the RSS feed. It'll look something like this:

http://api.flickr.com/services/feeds/photoset.gne?set=72157594145848803&nsid=97352149@N00&lang=en-us

In a perfect world, you should be able to open Blogger's Slideshow gadget, choose Other for Source, and then paste in the RSS Feed code in the Feed box. Unfortunately, it doesn't work.

Fortunately, Rick Klau at Blogger sent me the solution (provided to him by Brett Wiltshire, a Blogger engineer): append &format=rss_200 to the end of the feed code.

The RSS feed URL will then look like this:

http://api.flickr.com/services/feeds/photoset.gne?set=72157594145848803&nsid=97352149@N00&lang=en-us&format=rss_200

Go to Blogger, click Layout under the desired blog, and then click "Add a Gadget".

Blogger :: Add a Gadget

Choose Slideshow from the list that appears.

Blogger: Slideshow

In the Blogger Slideshow box, choose Other from the Source box. (You'd think you'd want to choose Flickr, but you'd be wrong.)

RSS Feed Choose Other

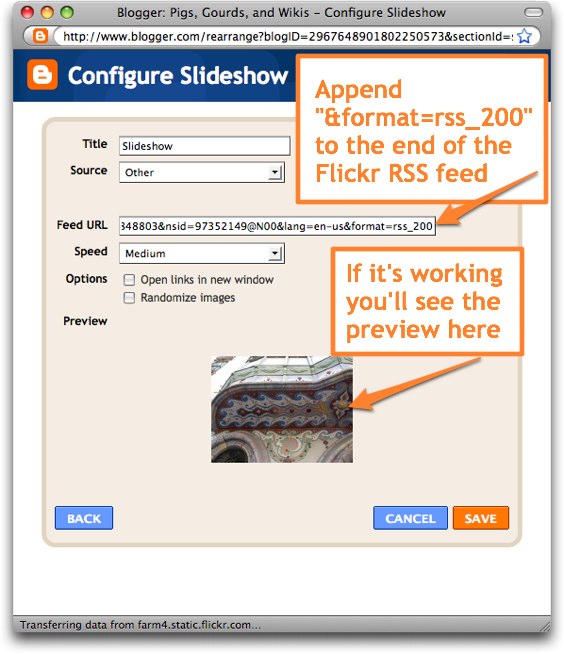
Next, paste the RSS feed into the Feed URL box. Make sure you append &format=rss_200 to the end of what you copied from Flickr.

RSS Feed Choose Other after

Note: A couple of my photo set feeds didn't work. When I wrote Rick and Brett again, they told me that sometimes you have to append &format=rss2 instead. And indeed, that solved the problem.

You'll know if the feed is working because Blogger will show a preview of the slideshow right in the dialog box.

And you're done. Now you can create a Blogger Slideshow from any photo set from any Flickr user!

Next, I'll explain how to customize the Flickr RSS feeds to use tags, usernames, and sets.

(Thanks Rick and Brett!)

Friday, August 14, 2009

Using new fonts from Kernest on Blogger

Are you sick of Times and Helvetica? Not to mention Trebuchet, Gadget, Arial, and Courier? It seems crazy in this day and age where you can output a gorgeous print document with beautiful fonts that the Web still be limited to a very short list of fonts. Especially since CSS has been capable of handling many more fonts for more than 10 years. But font foundries were wary of setting their fonts free and browser companies like Microsoft, Netscape, and Apple couldn't quite agree on what font format to support.

Thankfully, not everyone has been waiting around to see what shakes out, and have taken matters into their own hands. One of these guys is Garrick Van Buren, a developer in Minneapolis. He's gotten permission to make a big collection of fonts available on his server, for free, and figured out how to serve the appropriately formatted font to each browser as it requires. He told me there will be upwards of 400 new fonts by this weekend.

I've been itching to experiment with some new fonts... so I thought I'd give it a whirl. You can see the results right here in my blog. The title of my blog, Pigs, Gourds, and Wikis as well as the sidebar headers, date header, and post headers are all set in Taggeschrift, a sort of steampunk style font that matches the retro-newness of the topics I talk about here.

Here's how I did it. (Note, I haven't posted all the screenshots to this article, some are linked so they don't distract so much from the text. If they're particularly big but necessary, I insert a smaller version. Click on it to see the full version.)

First, go to Kernest.com and log in. Make sure you write down your password because there's not an easy way to recover one yet if you forget it (like I did :) though Garrick is working on it.

Maybe it's me, but once I logged in I wasn't quite sure what to do.

Kernest, now what?

So I'll tell you... go looking for fonts. See if you like any. Click on the Find more fonts by... link to see all the fonts in Kernest's collection sorted by style, license, foundry, designer, or family.

Kernest, Find more fonts by...

Once you're within a category, you'll see samples of the fonts themselves. If you're curious about a font, click it's sample text.

Kernest Tagesschrift sample

You'll get to the font's page on Kernest (notice the URL is http://kernest.com/font-name). You can type new sample text in the box at the top, perhaps to see how a particular header might look. And you can also just view the font at various standard sizes.

Kernest Tagesschrift main page

To use a font on your site, you need to add it to a project. A project is just another name for the web site where you're going to use the font. You add a project to your profile by adding its URL to the New website? box. If you've already created the project, it will appear in the USE '[THIS FONT]' ON YOUR WEBSITE box, and all you have to do is check it's name or URL. Otherwise, type its name in the New Website? box. Either way, you'll then click the Add to Selected Websites button.
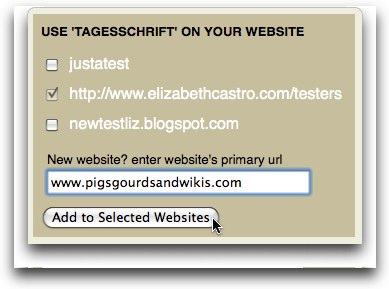
Kernest Add font to project

A message will momentarily flash at the top of your screen saying the font was added to your project, but I didn't find it particularly obvious how to use that information. The key is in the second sentence: Click project name's for embed code. (It means Click the project's name to get the embed code.)

So that's what we'll do. In that little beige box where you just clicked "Add to Selected Websites" you should now see the title of your project turned into a link. Click it.

Kernest - Go to project

This will bring you to your project page, found at http://kernest.com/projects/[your project name], where your project name may have the dots replaced by dashes. And it's where you'll find the needed code.

Kernest - Project page

You basically need two chunks of code, as my 3rd edition HTML book explained more than 10 years ago. First, you need to import the font using the @font-face rule. Kernest makes it relatively easy by creating a CSS style sheet on its server that contains the rule that you'll need for your site. To use it all you have to do is click in the PROJECT EMBED CODE box, and copy everything that's there. If you want, click the Show Raw CSS link to see exactly what the style sheet looks like. It's pretty straightforward. The link will look something like this:

<link href="http://www.kernest.com/www-pigsgourdsandwikis-com.css" media="screen" rel="stylesheet" type="text/css" />

(You can get more information about linking stylesheets on page 129 of my HTML, XHTML, amd CSS, Visual Quickstart Guide, Sixth Edition.)

If you like, you can copy the @font-face rule out of the style sheet and paste it directly into your own CSS style sheet. It's up to you. The advantage to leaving it on Kernest is that if you add a font later, the style sheet and rule will be automatically updated.

Now, where do you put that "embed code" or link element, which is nothing more than a link to the CSS stylesheet on Kernest? Anywhere in the <head> area of your Web site, preferably up near the top.

In this example, we're going to use it for a blog, so we have to dive into Blogger's innards. Go to your Dashboard on Blogger, and click Layout under your desired Blog.

Blogger, Layout settings

Then choose Edit HTML from the Layout tab.

Blogger, layout settings edit html

Now you'll see the HTMLly underbelly of your blog. Right there at the top, you should see the <head> section where you can stick in the link to your new Kernest stylesheet. Paste it right in.

Kernest - add css link to blogger

OK, now Blogger can import the font, but it doesn't know where you want to use it. In a simple Web site, you'd just need to set up some font-family CSS rules and apply them to different selectors, perhaps you want the h1 elements to use one font and the body to use another.

Blogger however, has another layer of information that goes on between its database and the output, namely a number of variables. Currently, Blogger has five text variables. In the Minima template that I'm using as a base, they're defined right up at the top of the stylesheet, just below the <head>. Scroll down a bit and you'll see them. The first chunk of them are variables that affect the color of objects, and the last five have to do with fonts. (It's set up this way so that you can change them by using the Fonts and Colors tab, but we're going to bypass that simpler but very limited system.)

Kernest - add Tagesschrift to blogger variables

The first of the five text variables is called "bodyfont". It affects every bit of text on the page, including, but not limited to the body text, the sidebars, the headers, everything. Think of it as the base style for your entire body.

The second variable is "headerfont" but it really only applies to the Sidebar headers and the Date Header (which appears above blog posts). This is a good place to use your new font. In Blogger's Minima style, there is a list of fonts that will be used, in order of preference. Replace the first font on the list with your new font from Kernest. You should probably use quotes if you've got a multi-word font name, otherwise, don't.

Variable number 3 is "pagetitlefont" and is only used in the Header area for the title of your blog. I used Tagesschrift here too.

The fourth text variable is called "descriptionfont" and is used exclusively for the description text that appears below the title of your font in the header. My steampunk font is a bit wobbly for that little text, so I left it in Trebuchet.

The last text variable is "postfooterfont" and as expected, affects the text that appears in the footers below a blog post that contain the name of the blogger, the time the blog was posted, whether or not there are comments, etc. Strangely enough, it also is used for some bits and pieces of the sidebars (though not the sidebar headers).

Of course, all this is all specific to Blogger's Minima template. You may need to dig in and experiment with your own template to see what each variable applies to.

Even when you've figured out the variables in a given Blogger template, you'll realize that some of the variables are way too broad (like bodyfont) and some are way too specific (like descriptionfont), or at the least, there aren't enough of them. That's when you dive into the CSS rules themselves. Scroll down a little further and you'll see the CSS rules that are applied to each and every element on your Blog.

Don't know what kind of element something on your blog is? View your blog and View source. Search for the text in the element and then sleuth out what kind of element it is. Then go back to Blogger's Edit HTML page and find the offending element. Then change the font-family, (or the size, style, or color) as you like.

For example, to change the font of the Blog post titles, I had to scroll down until I found the .post h3 selector which controls them. Then I added the font-family: 'Tagesschrift'; rule.

kernest - add Tagesschrift to blogger variables esp to h3

Use Blogger's Preview button copiously to view the changes to your blog before you publish them and make them live. Be sure and test it in as many browsers as you can. As far as I can tell, Kernest's font serving system works great at least in Firefox, Safari, and Internet Explorer, which covers the vast majority of my visitors. And it looks cool!

Here's what this site looked before Kernest:
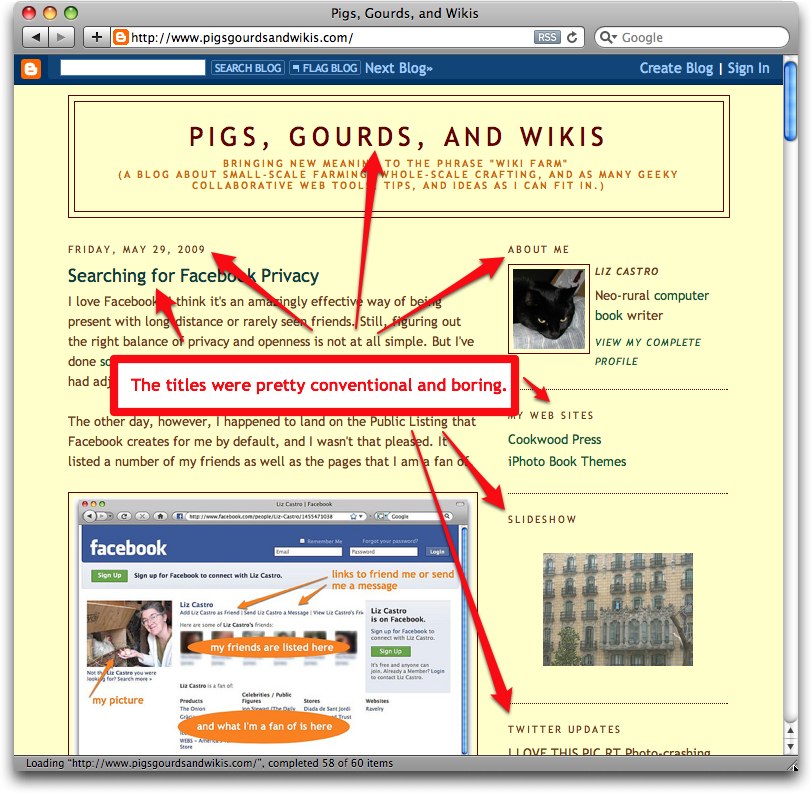
Kernest Before

And here's what it looks like now: (course you can see it right here as well):

Kernest - After

Friday, May 29, 2009

Searching for Facebook Privacy

I love Facebook. I think it's an amazingly effective way of being present with long-distance or rarely seen friends. Still, figuring out the right balance of privacy and openness is not at all simple. But I've done some research into the various possible options and thought I had adjusted my settings to a comfortable degree.

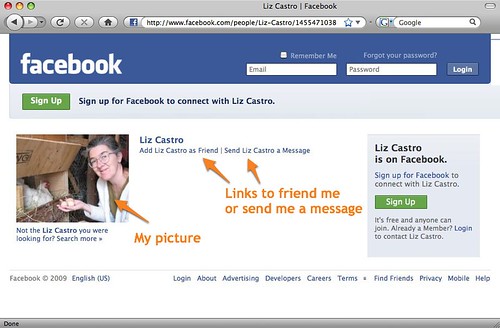
The other day, however, I happened to land on the Public Listing that Facebook creates for me by default, and I wasn't that pleased. It listed a number of my friends as well as the pages that I am a fan of.

Liz Castro's Public Profile on Facebook

(To see what your public Facebook listing looks like, type "<your facebook name> site:facebook.com" into Google and sift through the rest of the people who share your name until you find your listing.)

I'm not really keen on there being a public file of my friends. And what if my friends don't want to be seen on Facebook? And I'm not really that interested in showing the world every page that I choose to be a fan of on Facebook. I like Facebook because it allows some amount of privacy... so to have it displayed out on Google like that was a bit disconcerting. (And I am not unaware of the irony of posting that public listing that I don't like on my public blog. So I've blurred out my friends and really I don't care that much about the fan pages, it's just not right that they should be public.)

That said, I don't want there to be nothing. If an old friend wants to find me, I'd like them to see that I exist, even with my silly photo with the chickens. And I'm happy for them to be able to send me a message or friend me.

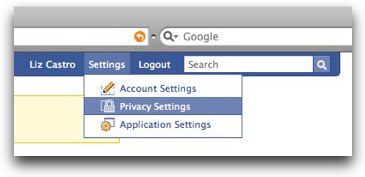
To control what appears in your public Facebook listing, log into Facebook and choose Privacy Settings from the Settings menu that appears near your name at the top of the window:

Facebook | Search Privacy

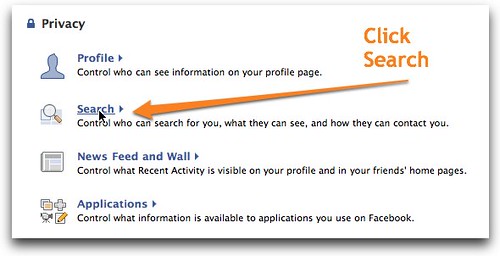
Now click Search on the page that appears:

Privacy Overview”

You'll then see a series of options. The first section determines who can find you when they are logged into Facebook. If you want to hide yourself from people already on Facebook, you'll want to adjust this option.

But the second and third sections deal with your Public Listing.

Facebook | Search Privacy

In the second section, I leave "My profile picture" checked, because I want it to be included in my public listing so that people can tell if I'm the Liz Castro they want.

I uncheck "My friends list" because I don't think this needs to be public information, and I'm not at all sure that my friends want it to be public information.

I leave both "A link to add me as a friend" and "A link to send me a message" checked, to facilitate people getting in touch with me.

I uncheck "Pages that I am a fan of" because again, I don't think this needs to be public information.

Finally, I leave "Create a public search listing for me..." checked because I do want friends to be able to find me.

Now my public listing looks like this:

Liz Castro | Facebook

That's much better.

(Just an aside. I use Facebook strictly for people I already know. If you're interested in knowing what I'm up to but don't know me personally, I'd rather you follow my Twitter stream.)

Friday, May 22, 2009

Color matching on Epson printer

I'm making some bookmarks and business cards for the Ashfield Farmers Market and noticed that the raspberry was coming out much more purple than red. I called Epson tech support with, honestly, little hope that they'd be able to help.

Boy was I wrong. I started asking the tech support person what sort of CMYK profile I should be using and if that could be the problem. She said that I shouldn't be using CMYK at all, but rather RGB. I admit I didn't believe her at first. Why would a printer with CMYK inks require that documents be in RGB to print correctly?

But it turns out that Epson's drivers do the RGB to CMYK conversion for you, and if you send it a CMYK file, it converts that to RGB and then back again, and in my case, makes it all purple. Send it a file in RGB, and it prints quite nicely.

Thank you, Epson!

Friday, May 01, 2009

TimeMachine doesn't back up iPhoto (if iPhoto is open)

A few weeks ago, I wrote about my travails with backing up my obscenely huge iPhoto library. It turns out that although Apple promises to "[take] care of everything else. Automatically. In the background." the truth is that Time Machine won't always back up an iPhoto library if it's open. In fact, it won't back up my iPhoto library ever if it's open. Is it backing up yours? I don't know. You should check.

I promised to get back to you when Apple got back to me. They did finally call me last week, and said, well, to solve the problem, simply close iPhoto and then do a backup. Well, Time Machine is supposed to backup on its own. That's the whole point. What's the point of automating backups if I have to choose them manually? The guy from Apple offered to walk me through starting a new iPhoto library (oh yeah, that's really helpful, thanks).

Maybe I'm naive, but I was pretty amazed that the guy didn't say, "Oh yes, this is a serious problem. We have our technicians working on it and as soon as they have a solution we'll get back to you."

No, he made it sound like I was being a whiner. And that it was my fault that Time Machine wasn't working as advertised. That there was something wrong with my iPhoto library. Give me a break.

But I got a few notes from people saying they had relied on Time Machine for backing up iPhoto and then lost their photos because of it. So, help me get the word out: Time Machine is not reliable about backing up iPhoto. Be sure to check your backups, do them manually, and spread the word so that no-one loses precious files.

Friday, April 24, 2009

Hide all Firefox Toolbars with a single click

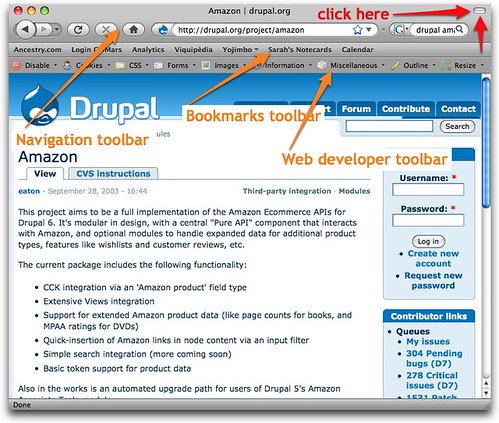
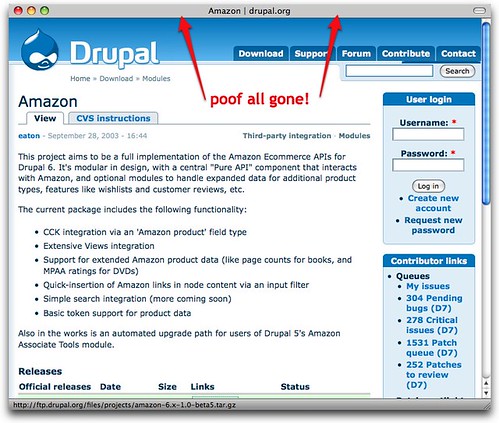
I just clicked randomly in the top right corner of a bucket of windows and something funny happened: the address bar and navigation bars disappeared and the content part of the window took over. It was rather nice. Check it out:

Here's the before, with all Navigation Toolbar (where the Address box and Search boxes are), the Bookmarks Toolbar, and even the Web Developer's Toolbar.

Firefox - hide toolbars

Click that little button in the top right corner, and poof, they all disappear, giving you much more space for the Web site you're looking at (or taking screenshots of, or whatever):

Firefox - hide toolbars

Tuesday, April 21, 2009

The best way to label photos

I'm not in the car often enough to listen to very many podcasts, but I have three favorites: This American Life, NPR's Sunday Puzzler, and Internauta.

This last is a program offered by Catalunya Radio and at least for me, serves the dual purpose of keeping me connected with Catalunya and keeping me up to date on technology there (and here).

The other day I was listening to an interview of David Iglesias, the head of the "Photographic Archive of Girona" about the best ways to organize and manage collections of photos. They have more than 3,000,000 photos!

There were a couple points I found very interesting. First, he recommended scanning positives, not negatives. Second, he suggested scanning at a size that would result in a photo measuring about 2000 x 3000 pixels. Thirdly, he said, make sure you label your photos.

If you don't label, the first two suggestions won't matter because you'll never find the photos anyway.

One lovely advantage of modern digital photos over photos of yesteryear on paper is that the digital ones are automatically dated. So, as soon as you take your camera out of the box, be sure and set the date, and set it correctly.

Next, use a photo organization program like iPhoto, Picasa, or whatever. Even if you do nothing more than put your photos in that program, you'll automatically have your photos organized at least by date (which is much better than having them scattered on your desktop).

The next step is to label them. I have way more photos than I can humanly label, so even if I promise myself a million times that I will label them all, I know I won't. I couldn't if I tried. But the worst part is that thinking I can do it will keep all my photos unlabeled. Instead, I figured out a great shortcut:

I exhaustively label each group of imported photos (in iPhoto these are now Events, but used to be called Rolls, in other programs sometimes they are Albums or Folders) with the names of every single person that appears in that group of photos, as well as the name of the event, location, and any other significant information.

Organizing photos

Note that I don't do it before I import (though that is possible in iPhoto) because I don't know who's in the Event at that point. Instead, I make the window a good size so that I can see everyone and still have a place to type in names into the Event window.

Later, I can search for a person's name, and this set of photos will appear. I will have to find the photo of the particular person I want, but that's a piece of cake now that I know it's in this reduced group of photos.

It reminds me of this great quote I saw the other day: "Organizing your email is like alphabetizing your recycling"... which in my mind means, "Don't do more work than you have to".

Wednesday, April 15, 2009

Switch tools in InDesign

This is a tiny tip but I love it. You already know that in InDesign you can choose the Selection tool by pressing the letter V and the Direct Selection tool by pressing the letter A. But what do you do if you're writing in a text box?

Hold down the Command key to temporarily switch to the Selection tool, click outside of the text box, and then press V or A, as you need.

Friday, April 10, 2009

Time Machine doesn't back up iPhoto

I've confessed before to having a scary number of photographs in my iPhoto library. However, since Steve Jobs promised that iPhoto could handle "hundreds of thousands" and since I only have a measly 40,000 I get downright testy when folks from Apple say I have too many.

This happened the other day. First, Time Machine just stopped working. Up and failed. Said it couldn't find the external drive I had just hooked up even though it had started running because said drive had just been hooked up.

I called Apple's tech support. The guy was nice and knowledgeable. Told me I had formatted the disk incorrectly, that instead of "Apple Partition Map" I should have used "GUID Partition Table" (because I have a MacBook with Intel processor). The only solution was reformatting the drive (using Disk Utility, selecting the drive, clicking the Partition tab, then clicking Options and choosing GUID).

"Why," I asked, "has it worked just fine for the last six months and today it decides it doesn't like that partition system?"

He said it was pretty random. OK, whatever. I reformat the drive.

I do a full backup, Time Machine seems much happier, but I notice that the backup file only takes up 150gb. How can that be if my iPhoto library alone takes up 162gb?

I call Apple up again. The new guy says, oh well, that sounds about right, you know, because of the compression.

But on Apple's site, it specifically says that Time Machine "copies every file exactly (without compression), skipping caches and other files that aren’t required to restore your Mac to its original state".

I point out this discrepancy and he puts me on hold as he goes to check it again.

While he's gone, I go into the backup file to see if my iPhoto Library is even there. Of course, it is not. (How could it be?)

When the Apple guy gets back on the phone, I tell him that Time Machine has not backed up my iPhoto Library at all and he says, with jaw-dropping alacrity:

"Well, it's not perfect."

I'm shocked. A backup program that skips my most important files is "not perfect".

He says, "Well, why don't you just drag the iPhoto Library to your external drive to back it up?"

Apart from the fact that it takes several hours to copy the entire library, and that this seems like a pretty lame workaround for updating the few photos that I might back up each day, I am just flabbergasted that he doesn't admit that the program has a fatal flaw. It doesn't do what it promises.

He offers no apology, no recognition that this is a big deal. I get off quickly before he can harangue me with "Is there anything else I can help you with today?"

I immediately call back and speak to Apple support guy #3. He gets that skipping my iPhoto Library is serious and has me send him my log file. He promises to get it to the engineers and get a response back within 3-5 days. It's been 3 and so far, no news.

Meanwhile, I can't not backup my iPhoto Library so I find another external drive, and copy the whole thing over. When I'm done, I decide to do one last test. I close iPhoto and try Time Machine again. This time it works, iPhoto Library and all.

So, the moral of the story is, first, make sure Time Machine is backing up your large important files. How? Open the drive where Time Machine stores the backups, open the folder "backups.backupdb", open the folder with your user name, open the folder of one of the dated backups, and go through your file structure until you find the files you're most interested in. (They should be in the same places as on your computer.)

Second, if you have a large iPhoto Library (and perhaps even a small one), make sure it's closed at least some of the time when Time Machine is running.

It unnerves me to no end to know that Time Machine may randomly decide not to back up certain files. If this is really the case, then I need a new backup program. I'll let you know what Apple says.

Monday, March 30, 2009

Formatting Cross-References in InDesign

For years I used FrameMaker to layout my books so that I could take advantage of its robust cross-referencing. I was so dependent on its power that I stuck with it as it crashed continously and made me jump through hoops to get images and color the way I wanted them. But when I got my Intel MacBook, I had to say goodbye... Frame wouldn't run on Classic and Adobe decided not to upgrade Frame for OSX. So, I went back to InDesign and marveled at how my fingers still remembered so many keyboard shortcuts from my PageMaker days.

But if you've seen any of my books since then, you'll know that I have really had to tone down my penchant for copious cross-referencing. No longer! Though I tend not to upgrade unless I have to, InDesign's new cross-references had me chomping at the bit. And I have not been disappointed.

InDesign not only lets you create cross-references but gives you a fair bit of control over how to format them. Today I completely automated the extra bits section of my upcoming 2nd edition of my Blogger book.

The title of each extra bits section comes from the corresponding header earlier in the chapter, along with a page number, which in turn has its own character style.

InDesign offers the "Character Style for Cross-Reference" option for applying a character style to the entire cross reference, but you have to check the help files to see how to add a character style to only a portion of the cross-reference. Basically, you add <cs name="style name"> before the part of the cross-reference that should be formatted with the style name style, and </cs> after it.

What I discovered though, and the reason I'm writing this instead of just pointing you to the documentation, is that you need the "Character Style for Cross Reference" option even when you're not applying a character style to the whole cross-reference.

In my example, I want to grab the header name, append "p." and then grab the page number. I want the header to be styled with the "extra bits header" paragraph style and the page number to also be styled with the "extra bits page number" character style.

So, I start out with <fullPara /> <cs name="extra bit page number"> p. <pageNum /></cs>, and don't check "Character Style for Cross Reference". But curiously, it applies the extra bit page number style to the whole cross-reference and not just the bit it surrounds.

The solution is to choose "Character Style for Cross References" and then choose [None] in the pop-up menu. Now the header uses just the paragraph style and the p. and the page number use the character style as well.

Hmm. Now I'm getting intermittent results. That is, sometimes I need to check the "Character Style for Cross-References" option and sometimes not. Well, if it helps to keep part of the cross-reference in the base style, you know you heard it here first :)

Tuesday, March 24, 2009

Ada Lovelace Day, or On the Shoulders of Giantesses

Suw Charman-Anderson put out a challenge to her readers to honor Ada Lovelace, the first computer programmer (ever!) by writing blog posts on March 24 about women in technology whom they admire. So, Happy Ada Lovelace Day!

Although there are many women in technology who I admire, among them Dori Smith, Molly Holzschlag, Robin Williams, and Lynda Weinman, there is one who was a particular inspiration to me: Laura Lemay.

I don't know Laura personally, but when I was just learning HTML, she had three or four books already out on the topic. And though I found the information in her books useful, among other sources, what really inspired me was her attitude. She was a really smart programmer, and wasn't shy to tell you about it. I loved that she was a woman. If she could do it, I could do it.

Thanks, Laura!

And now she has chickens like me!

Tuesday, February 17, 2009

iPhoto's new Faces feature really does work!

I take a lot of pictures. If you've ever visited my Flickr site, you know that I take my camera everywhere and I'm a bit compulsive. I've tried different programs for organizing my photo files and always come back to iPhoto. I now have more than 42,000 photos, and no other program I've found lets me just type in a date or a person's name to quickly find the photo I need.

Course, sometimes the date is not enough, and I have been, well, less than diligent in labeling my photos. Honestly, you can't label 40,000 photos and still have a life. I am pretty careful about labeling all my Events (complete with the names of all the people included in each event), and I label photos before I export them to Flickr. Still, that leaves a lot of unlabeled photos.

That's why I was curious about iPhoto's new Faces feature. The idea is that iPhoto can recognize faces in your photo collection and thus make it easy to bring up all the pictures, say, of your Uncle Henry, or in my case, of my Dad.

Here's my test of Faces.

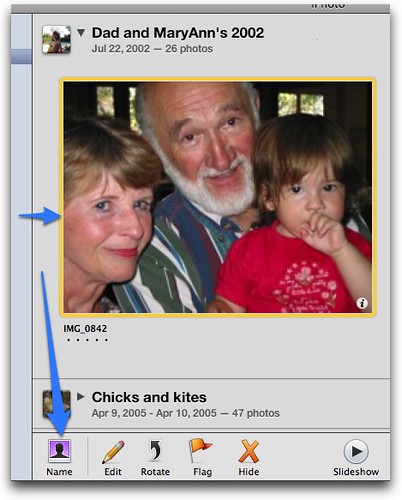
I choose a picture of my Dad where I can see his face full on.

Choose picture

Then I click Name (leftmost icon at the bottom of the window). iPhoto identifies the faces and asks me to label them. (If it can't identify what's a face, you can draw a frame around the face yourself.)

Label Face

I type in "John" for my Dad and press Enter.

Go to Faces

Once I press Enter, a little arrow appears next to the name. I click it to jump to the Faces section (for this particular person).

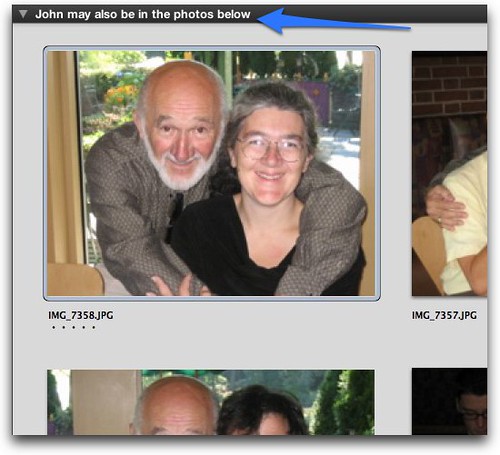
Now the magic begins. At first, there is a tantalizing title, "John may also be in the photos below", but no pictures. But after a few moments, iPhoto brings up the photos that it thinks contain the same face as the one you labeled:

John may also be in the photos below

In this example, based on the single example of my Dad's face, iPhoto initially brought up 38 more pictures, every single one of which included my Dad at various stages of his life. It's not always this spot-on, but still, I think it's pretty remarkable.

Once it gives you suggestions, you can either use them for the project you're working on (say, by dragging them into an album), or you can confirm (or reject) the suggestions in order to hone iPhotos recognition.

To do confirm or reject suggestions, start by clicking the Confirm Name button at the bottom of the window.

Confirm Name button (iPhoto)

iPhoto automatically switches to a close-up view of the face in question. This makes it really easy to see if the person you want is really in the photo. (You can also switch to close-up view without confirming suggestions by clicking the close-up button.

John may also be...

Then to confirm that the face belongs to the person in question, click the photo. To reject the suggestion, click twice on the photo. You can also drag to accept a bunch at once, option-click to reject with a single click, or option-drag to reject a bunch at once. Accepted photos will display the person's name on a green background as shown below. Rejected photos will show "Not [your person]" on a red background.

Confirm name after

Once you've given iPhoto more data, click Done at the bottom of the window and it will scan your collection for more photos that include the face you're working on.

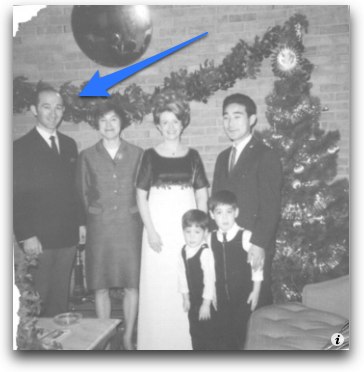
I'm pretty impressed. iPhoto found pictures of my Dad on all sorts of backgrounds, in different brightnesses, and even in old, black and white pictures that I had scanned in from 41 years ago:

Faces in iPhoto

And that means those photos are that much easier to get your hands on, to use, and especially, to share.

When you go to the Faces page, you can scan through all the pictures of a given person just like you might with any Event. I love just flipping through them. (To choose the one for the "cover", flip to it, and hit the spacebar.)

I'm not good at faces myself. I'm much more apt to remember what someone says to me than whether or not they have a beard or a sharp nose or some other facial feature. It's been really interesting to see which faces iPhoto confuses and which ones it considers similar. And I always love having an excuse to go through my photos. All 42,146 of them.

Sunday, January 25, 2009

Facebook, Barcelona, and Old Friends

It feels like forever ago since I got this link and read the article but it turns out it was only a few days. It's been on my mind. Every time we come to Barcelona (ok, and when we're in the US too, but perhaps less, because it feels slightly less intentional) I have to figure out what we're doing here. I mean, mostly I know this. We come to see friends, to surround the kids with cousins and Catalan, but above all, we come to maintain the connection with the people here we love. It's both exciting and exhausting to plan these full weekends of concentrated conversations that usually happen only once a year.

And it makes me wish they were all on Facebook so that I could have a little more of the boring middle time with them.

There was a time that my sister and I could barely get together without arguing. And so we started trying to work things out and we would have these huge long discussions practically every time we saw each other and it was so exhausting and we never got anywhere and I said I had to stop. That I needed some regular time with her. That we needed to have some time where we didn't fight, even if we were papering over, temporarily, the hard stuff between us. Let's just pretend to like each other for a while, I said, (because really we do but we can't remember it) and do something insignificant, like a movie or bowling or whatever, and then maybe we can build from that tiny, unimportant, but real connection instead of building a meaningful relationship out of heavy conversations about meaningful relationships.

Because the hardest part about being in Barcelona is suddenly appearing here, into people's lives.

I remember this in the reverse when I lived here and made visits home. It's fun for about two minutes being the celebrity and then I just want to be normal and have regular conversations with my friends. And I don't want every conversation to have to be so loaded. If you could only have one conversation, what would you talk about? Acks! I don't want small talk either, that sort of generic filler you could have with someone you don't know, but especially from here, I can really see the value of seemingly insignificant (Facebook facilitated) connections that can form the backdrop if not the foundation for the great conversations.

Is the problem trying to live these two different lives? Probably. But I don't know how to give up either one, or even if giving up either one is an option. I think about living here and I love the thought of it. I really do. But I don't know how I could not be at home. That's been my dilemma for half my life now.
My Books